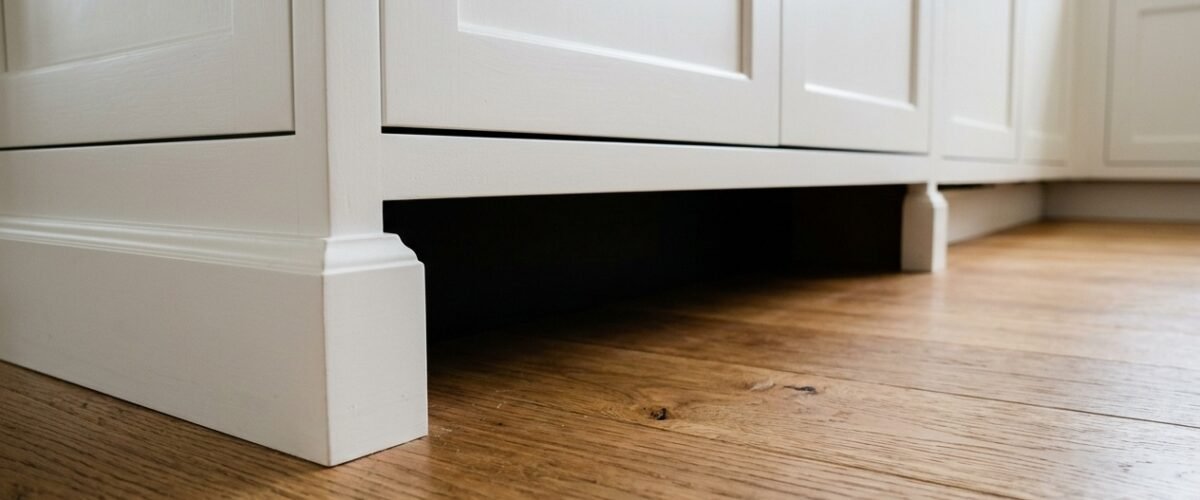
A kitchen cabinet toe kick is the recessed architectural notch located at the base of lower cabinets, allowing cooks to stand close to countertops without stubbing their feet. The standard industry dimension across American residential cabinetry is 3.5 inches tall by 3 inches deep, though slight variations exist across modern European and ADA compliant designs. In practical terms, this ergonomic recess permits natural balance during food preparation tasks. Without this notch, your feet strike the cabinet baseboard, forcing you to lean forward uncomfortably over your workspace.
Standard Kitchen Cabinet Toe Kick Dimensions
Standard Height and Depth Specs
First, residential cabinet specifications feature a 3.5 inch to 4 inch height paired with a 3 inch recess depth. This geometry provides sufficient ergonomic clearance for adult shoe sizes. At the same time, it maintains optimal 36-inch finished countertop work heights across typical home layouts. Most cabinet makers set the standard rough box riser at 3.5 inches tall, leaving room for finish floor materials.
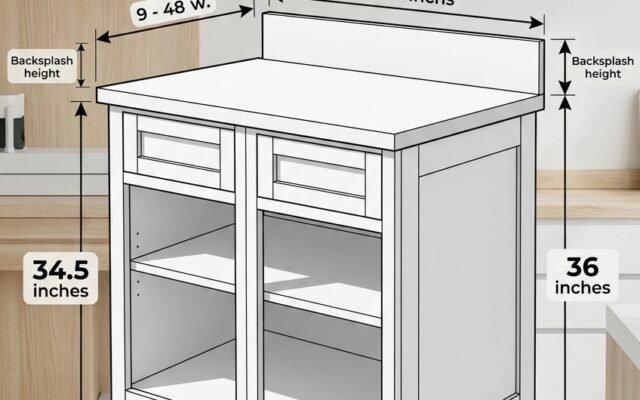
In addition, contractors evaluate vertical heights and depth together. Standard lower boxes stand 34.5 inches tall before countertop installation, reaching 36 inches with stone tops. Standard boxes measure 24 inches deep, placing the recessed riser 21 inches from the wall. Countertop overhangs of 1.5 inches deliver 4.5 inches of total toe clearance. Review our guide on kitchen base cabinet dimensions for comprehensive layout planning.
Ergonomics and Human Factors
Second, ergonomics plays a fundamental role in cabinet construction. Without an adequate toe space recess, standing upright forces homeowners to bend forward at uncomfortable angles. Over extended cooking sessions, poor posture causes noticeable lower back and shoulder fatigue. Your body balance relies on placing your center of gravity directly above your feet.
Therefore, standing against flat vertical cabinetry creates constant postural strain. Your feet hit the wood, so your torso tilts forward across the counter workspace. Even a modest spinal tilt increases stress on your lower lumbar discs. Expanding recess depth to 3.5 or 4 inches enhances everyday comfort in busy family kitchens.
ADA Compliant Toe Kick Dimensions
Third, accessibility standards introduce specialized dimensional guidelines. The Americans with Disabilities Act mandates a larger toe space of 9 inches high by 6 inches deep for wheelchair footrest clearance. This modification requires custom lower boxes or elevated platform framing beneath the cabinet run. As a result, seated cooks can maneuver close to preparation surfaces safely.
Because standard stock boxes lack a 9-inch recess, universal design projects require modified lower assemblies. In addition, you must learn how to measure kitchen cabinets accurately to ensure accessible clearances match strict local building codes. Standard 3.5-inch toe notches fail commercial inspections when wheelchair footrests strike cabinet panels.
Toe Kick Construction Methods
Integrated Cabinet Box Notches
First, traditional American face-frame stock cabinets feature pre-notched side carcass panels. The bottom shelf sits directly atop the recessed riser, offering simple installation straight from factory packaging. Manufacturers cut the toe notch directly out of each side plywood panel during factory milling. This creates a rigid single-piece cabinet box ready for delivery.
However, integrated notches can present challenges on uneven subfloors. When floor heights fluctuate across a room, leveling individual pre-notched boxes requires extensive shimming beneath each cabinet side. In addition, many homeowners purchasing ready to assemble kitchen cabinets face rough notches with continuous finish skins to hide assembly seams.
Separate Continuous Platform Bases
Second, frameless European cabinetry and high-end custom installations often mount atop a separate continuous 2×4 lumber ladder base. Installers level the base once across uneven subfloors before dropping boxes onto it. Specifically, carpenters construct this ladder framework using dimensional lumber ripped to the exact target height. They shim and fasten the ladder directly to the subfloor.
Consequently, setting individual cabinet boxes becomes fast and straightforward. Custom cabinet makers frequently pair platform bases with classic shaker kitchen cabinets for a clean built-in appearance. Continuous platform bases eliminate gaps between adjoining boxes, creating solid support beneath heavy stone counters. You can browse options at Home Depot to find framing lumber and base components for your kitchen renovation project.
Adjustable Leveler Legs with Clip-on Boards
Third, modern modular systems utilize heavy-duty plastic leveling legs with quick-release clips. Installers twist each leg to level cabinets on irregular tile, then snap the finished toe skin into place. European cabinet brands popularized this approach because it isolates wooden cabinet boxes from moisture pooling on concrete or tile floors.
Also, adjustable legs make leveling large cabinet banks exceptionally fast. An installer adjusts each threaded foot using a hex key or hand grip until laser levels indicate a flat plane. Finally, clip-on toe systems offer superior maintenance access. If a hidden plumbing line leaks beneath your sink, you can unsnap the toe board in seconds without damaging trim nails.
Materials and Trim Finishes
Continuous Toe Kick Skin Panels
First, manufacturers supply long 8-foot or 10-foot thin veneer panels, typically one-eighth or one-quarter inch thick. These continuous skins cover joints between multiple cabinet boxes for a smooth visual line. While individual cabinet boxes have rough plywood notches, the continuous skin conceals all vertical seams and shimming gaps behind one seamless face.
In order to achieve professional results, installers cut these thin panels to match the total linear run of the cabinetry. Using continuous boards prevents unsightly vertical lines beneath adjacent cabinet doors. To learn more about decorative baseboard profiles and matching moldings, read our complete guide to kitchen cabinet trim.
Hardwood vs Matching Vinyl Skins
Second, choosing between solid hardwood and matching vinyl skins depends on your budget and cabinet style. Solid stained hardwood skins match natural oak, maple, or cherry wood grain textures perfectly. In contrast, durable vinyl or melamine wraps provide budget-friendly, scratch-resistant protection in moisture-prone zones. Both materials serve distinct functional roles in modern homes.
For example, hardwood skins offer authentic grain depth that complements custom stain finishes. Review our breakdown of kitchen cabinet wood types before choosing your finish trim. On the other hand, vinyl and foil wrapped skins resist moisture penetration completely. You can explore selections on Wayfair for prefinished trim materials and matching accessories.
Shoe Molding and Base Shoe at the Floor
Third, installers frequently install quarter-round or shoe molding along the bottom seam where toe skins meet uneven flooring. This secondary trim conceals gaps caused by floor dips without extensive scribing. Even experienced carpenters encounter floor undulations of a quarter-inch across ten feet of tile or vintage planking.
Therefore, nailing flexible shoe molding along the bottom joint covers shadows and uneven floor lines. Unlike wide baseboards, shoe molding measures just half an inch wide and bends over minor floor waves. In addition, base shoe trim protects the primary toe skin panel from heavy vacuum strikes and cleaning equipment.
Integrating HVAC and Special Features
Toe Kick Heating Vents and Grilles
First, heating ducts commonly terminate beneath base cabinetry. Installing specialized low-profile metal grilles or duct diverter kits prevents heat from trapping inside cabinet cavities and warping food stores. When supply boots sit directly under cabinet footprints, builders cannot simply cut a floor register into room centers.
Instead, contractors install a specialized sheet metal or flexible duct diverter beneath the lower cabinet box. This diverter channels airflow from the subfloor opening directly to an exterior toe kick grille. You can check current prices on Amazon for heavy-duty metal toe kick grilles and duct adapter kits.
Under-Cabinet Toe Kick Lighting
Second, adding warm 2700K or 3000K recessed LED tape strips beneath the toe kick recess provides subtle nighttime illumination. This lighting trend highlights floating cabinet aesthetics while guiding footsteps safely. By tucking flexible LED channels into the upper corner of the toe recess, fixtures remain invisible while casting soft glow onto flooring.
Also, toe kick lighting creates outstanding modern visual depth. In contemporary kitchens with slab doors, lighting the bottom recess makes bulky islands appear to hover effortlessly above the floor. To review channel profiles and wiring, browse our complete resource on kitchen cabinet lighting options.
Toe Kick Step Stools and Pet Bowls
Third, modern kitchen innovators install hidden pull-out step stools or shallow pet feeding drawers inside the toe kick cavity. These clever organizers transform dead base space into high-utility features. Because the void beneath standard cabinet shelves offers nearly four inches of vertical clearance, custom hardware manufacturers produce ultra-slim glide systems.
For instance, a toe kick step stool folds flat inside the base cavity when not in use. When you tap the magnetic latch with your toe, the step slides out and locks into position. Similarly, pull-out dog and cat bowls fit neatly inside the same base void. Check out our guide to kitchen cabinet organization strategies for more clever ideas.
How to Install a Toe Kick Step by Step
Step 1 Measuring and Scribing to the Floor
First, measure each linear run of base cabinetry accurately. If the flooring slopes, scribe the bottom edge of the continuous skin panel so the top seam remains parallel to the cabinet box bottoms. Start by setting your compass or scriber to the widest gap between the floor and the cabinet face.
Next, hold the toe skin panel firmly against the cabinet face with painters tape. Run the compass pencil along the floor contour, transferring any bumps or dips directly onto the bottom edge of the wood skin. Proper planning ensures seamless lines across your entire kitchen cabinet installation project.
Step 2 Cutting Skin Panels to Length
Second, cut veneer panels face down with a fine-tooth finish blade on a miter saw to prevent delicate face veneer splintering. Allow joints to overlap at discreet corners or centered seams. Thin cabinet skins tear easily when cut with coarse construction saw blades, leaving ragged finish edges.
Therefore, use an 80-tooth finish blade when trimming finished wood trim skins. If you must rip the skin width along its length, use a table saw equipped with a zero-clearance insert. Also, when joining multiple pieces along an extended cabinet run, cut matching 45-degree scarf joints rather than flat butt joints.
Step 3 Fastening Panels Securely
Third, apply construction adhesive or contact cement along the recessed cabinet face. Secure the skin using 18-gauge brad nails with micro pins spaced every 12 to 16 inches along top and bottom edges. Adhesive creates a solid permanent bond, while brad nails hold the skin firmly while glue cures.
However, always verify nail lengths before firing your pneumatic nail gun. Using 1-inch or 1.25-inch brads secures the thin skin into the cabinet riser without puncturing through into interior cabinet storage areas. If you are refreshing older cabinetry alongside new base trim, read our guide on kitchen cabinet makeover techniques.
Step 4 Sealing Against Moisture
Fourth, seal the joint between the toe skin and the tile or hardwood floor with clear silicone or color-matched caulk. This critical bead prevents mop water and spills from soaking into raw subfloors. Water seepage under base cabinets frequently leads to hidden wood rot and mold development.
Consequently, applying a thin, consistent bead of 100 percent silicone caulk provides essential insurance against liquid damage. Smooth the caulk bead with a damp profiling tool to create an invisible watertight perimeter. In addition, check that dishwasher water supply connections sit tight before completing the bottom seal.
Toe Kick Dimensions Comparison Table
Key Toe Kick Dimensions by Installation Type
Below is a quick reference guide detailing standard toe kick dimensions, depth allowances, and recommended materials across various kitchen cabinet styles. Comparing these dimensions ensures your design maintains proper ergonomics and code compliance.
| Cabinet Application | Height | Depth | Primary Purpose | Standard Material |
|---|---|---|---|---|
| Standard Residential Base | 3.5 to 4.0 inches | 3.0 inches | Ergonomic foot clearance | Matching 1/4 inch wood skin |
| ADA Accessible Cabinetry | 9.0 inches | 6.0 inches | Wheelchair footrest access | Heavy-duty laminate or vinyl |
| European Frameless System | 4.0 to 6.0 inches | 2.5 to 3.0 inches | Adjustable leveler leg cover | Aluminum or clip-on PVC |
| Kitchen Island Furniture Base | 0.0 to 4.0 inches | 0.0 to 3.0 inches | Furniture base or bun foot look | Solid hardwood trim base |
As shown in the table above, residential kitchens balance ergonomics and storage space with 3.5-inch base recesses. Meanwhile, accessible spaces require significantly taller cutouts to accommodate wheelchair footrests. Selecting the correct geometry early in your layout planning avoids costly remodeling adjustments later.
FAQ
What is the standard height of a kitchen cabinet toe kick?
The standard height across residential kitchens is 3.5 inches to 4 inches, which aligns base cabinet height at 34.5 inches before countertop installation. Adding standard 1.5-inch countertops brings the total kitchen working height to 36 inches. This finished height delivers optimal ergonomic comfort for standing food preparation.
How deep should a cabinet toe kick be?
The standard depth is 3 inches recessed from the front face frame of the base cabinet, providing natural room for toes while cooking. When combined with a 1.5-inch countertop overhang, cooks enjoy 4.5 inches of total clearance. This space allows you to stand upright without leaning awkwardly across work surfaces.
Can you install kitchen cabinets without a toe kick?
Yes, islands and decorative accent hutches occasionally use furniture-style flush baseboards or decorative turned legs, though work areas benefit from a toe recess. Flush cabinets look elegant in traditional dining spaces. However, working at flush countertops for long periods forces awkward posture and stubbed toes.
How do you cover gaps under cabinet toe kicks?
Homeowners install matching shoe molding, quarter-round trim, or flexible base trim along the bottom edge to disguise dips and irregular floor gaps. Fastening thin shoe trim directly to the toe skin panel conceals uneven floor undulations. In addition, sealing the seam with color-matched caulk blocks moisture penetration.
How do you handle heat vents in a cabinet toe kick?
Install an HVAC toe kick duct diverter kit beneath the cabinet carcass to direct hot or cold airflow straight through a stamped metal toe grille. Diverters connect directly to subfloor supply boots, guiding conditioned air smoothly into the room. This prevents trapped heat from drying out cabinet boxes and spoiling pantry goods.