Kitchen cabinet trim is the finishing layer that separates a basic cabinet installation from a custom built in look. First, you must understand the different components. Next, you will see how each piece transforms the space. Therefore, adding these details is crucial for a professional finish. In addition, trim covers gaps between cabinets and walls.
Ultimately, the four main types are crown molding at the top, light rail molding at the bottom of uppers, scribe strips at the wall seams, and base molding at the toe kick. Specifically, each type adds a distinct visual level and has a different installation difficulty.
Because there are many choices, selecting the right trim can feel overwhelming. Naturally, we will break down each option in detail. First, we will explore upper trim options. Second, we will look at lower trim details. Then, we will discuss costs and installation. In short, this guide provides everything you need.
Crown Molding for Kitchen Cabinets
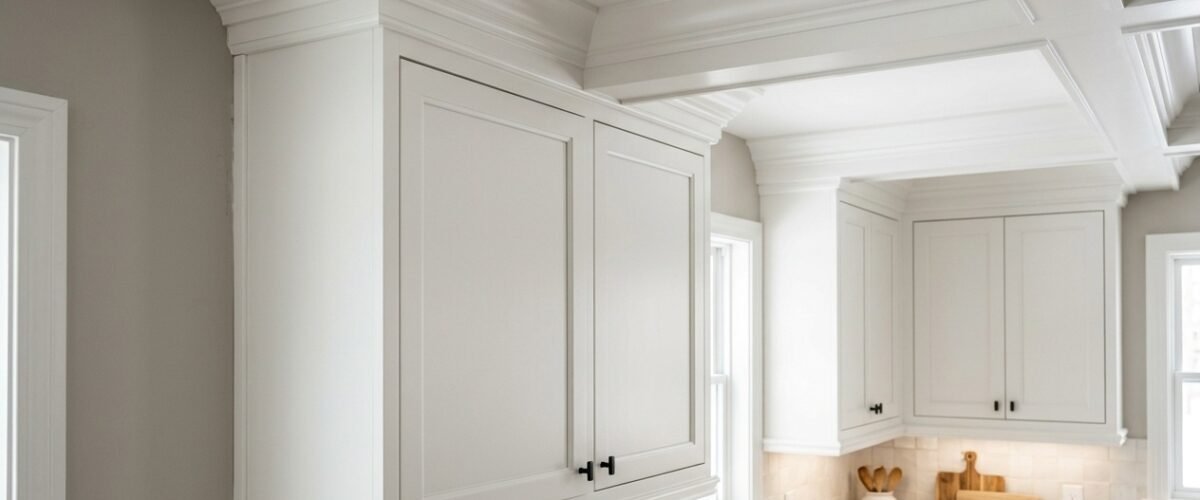
Crown molding sits at the very top of your upper cabinets. Specifically, it provides a seamless transition to the ceiling. Consequently, kitchens without crown molding often look unfinished. In addition, crown molding draws the eye upward. Therefore, it makes the room feel taller. Ultimately, kitchen cabinet crown molding is essential for traditional designs.
What Crown Molding Does
First, crown molding closes the gap between upper cabinet tops and the ceiling. Second, it creates a built in furniture look. The standard gap between the cabinet top and the ceiling is 12 to 18 inches. However, crown molding can bridge gaps up to 6 to 8 inches with standard profiles. Larger gaps require a soffit or stacked crown. Therefore, careful planning is necessary.
Crown Molding Sizes and Profiles
Standard crown molding features a 2.25 inch to 4.5 inch face. Conversely, a stacked crown combines two profiles for a taller look. First, you build a base. Second, you attach the top profile. Most kitchen crown runs at a 38 degree spring angle. Furthermore, popular profile options include cove, ogee, dentil, and plain flat styles. Ultimately, the profile sets the kitchen style.
Crown Molding Materials
First, solid wood is the most paintable material. Also, it takes detail well. Solid wood costs $3 to $8 per linear foot. Second, MDF crown is best for painted cabinets. Specifically, it has no grain telegraphing. MDF costs $1.50 to $4 per linear foot. Finally, polyurethane foam is lightweight and paintable. It costs $1 to $3 per linear foot. However, foam is not for humid environments.
Cost of Cabinet Crown Molding
Material costs range from $80 to $400 for an average kitchen. In addition, professional installation adds $400 to $1,200 for labor. Specifically, contractors charge more for complicated angles. Therefore, complex kitchens cost more. Furthermore, DIY difficulty is intermediate to advanced. This is due to coped corners and compound miter cuts. Check current prices on Amazon.
How to Install Crown Molding on Kitchen Cabinets
First, measure the total linear feet required. Next, cut outside corners at 45 degrees with a compound miter saw. Then, cope the inside corners for a tight fit. After that, nail the trim to the cabinet face frame with 2 inch finish nails. Finally, fill the nail holes with putty. Ultimately, prime and paint the trim to match the cabinets.
Light Rail Molding for Kitchen Cabinets
Light rail molding attaches to the bottom of upper cabinets. Specifically, it provides a finished edge. Also, it hides unsightly fixtures. Therefore, it improves the overall aesthetic. Furthermore, light rail is very common in modern designs. In addition, it is highly functional. Ultimately, it completes the upper cabinet look.
What Light Rail Molding Does
First, it closes the gap at the bottom of upper cabinets. Second, it hides the underside of the cabinet box. In addition, it conceals kitchen cabinet lighting strips. As a result, it creates a finished furniture bottom edge. Specifically, the standard height is 1.5 to 2.5 inches. Therefore, it is prominent but not overwhelming.
Light Rail Profiles and Sizes
Standard light rail features a simple bottom cove profile. Specifically, it is 1.5 to 2 inches tall. Also, rope light rail has a routed channel on the back. This channel hides LED strip light wiring. Meanwhile, dentil light rail provides a decorative notched profile. Specifically, dentil works best for traditional kitchens. Therefore, choose based on your design theme.
Cost of Light Rail Molding
Material costs range from $1.50 to $4 per linear foot. Consequently, the total material for an average kitchen is $50 to $200. In addition, professional installation ranges from $200 to $600. However, the DIY difficulty is beginner to intermediate. Therefore, many homeowners tackle this project themselves. Browse options at Home Depot.
How to Install Light Rail Molding
First, measure the undersides of your upper cabinets. Next, miter the outside corners at 45 degrees. Then, butt join or cope the inside corners. After that, nail the trim to the cabinet bottom. Specifically, use 1.5 inch finish nails at 12 inch intervals. Finally, touch up the paint. Ultimately, the installation is straightforward.
Scribe Molding for Kitchen Cabinets
Scribe molding is a subtle but critical detail. Specifically, it hides imperfections in your walls. Also, it ensures a tight fit everywhere. Therefore, professional installers use it constantly. Furthermore, it is very inexpensive. In addition, it is easy to work with. Ultimately, it is the secret to a flawless kitchen cabinet installation.
What Scribe Molding Does
First, it is a thin flexible strip. Second, it covers the gap between the cabinet end panel and an out of plumb wall. Specifically, walls are rarely perfectly flat. Therefore, scribes are essential for a clean finish. Standard widths include 0.5 inch, 0.75 inch, 1 inch, and 1.5 inch options. As a result, you can cover almost any gap.
Types of Scribe Strips
First, flat scribe is a simple flat strip glued to the cabinet end. Second, shaped scribe has a profile matching the cabinet door profile. Specifically, it is used on face frame edges. Furthermore, we must compare scribe molding vs cabinet filler strips. While scribes are thin and flexible, filler strips are wider and rigid. Therefore, use scribes for uneven walls.
How to Scribe a Cabinet to a Wall
First, hold the scribe strip against the wall. Next, set a compass or scribing tool to the widest gap. Then, trace the wall profile onto the scribe. After that, cut the line with a jigsaw or coping saw. Finally, glue the strip to the cabinet end. Specifically, use construction adhesive or cabinet glue. Ultimately, this creates a custom fit.
Cost of Scribe Molding
Material costs are $0.50 to $2 per linear foot. Consequently, this is a very low cost item. In fact, most kitchens use less than 20 linear feet total. Therefore, the overall material impact is minimal. Furthermore, professional installation is usually included in the main labor quote. As a result, it does not add significant expense.
Base Molding and Toe Kick Trim
The bottom of your cabinets requires special attention. Specifically, this area takes a lot of abuse from feet and brooms. Therefore, durable trim is essential. In addition, the right trim anchors the cabinets visually. Also, it hides gaps near the floor. Ultimately, base molding completes the installation properly.
Toe Kick Explained
First, the toe kick is the recessed area at the bottom of base cabinets. Specifically, it is typically 3.5 inches tall and 3.5 inches deep. For more details on sizing, check our guide on kitchen base cabinet dimensions. Second, toe kick panels cover the legs or platform base. Standard finish options include painted MDF or matching cabinet finish vinyl. Therefore, you have durable choices.
Base Molding at the Toe Kick
First, this is a thin cove or quarter round molding. Second, it is applied where the toe kick panel meets the floor. Specifically, it closes small gaps from uneven floors. Standard sizes include 0.75 inch quarter round or 1.5 inch base cove. Therefore, it provides a clean transition. Ultimately, it protects the raw edge of the toe kick board.
Decorative Furniture Feet at the Base
First, furniture feet or bun feet are added to base cabinet ends. Second, this creates a freestanding furniture look. Specifically, they are available in wood and resin. Heights range from 2 to 4 inches. However, this requires raising the cabinet on a platform. Specifically, you must do this to maintain standard counter height. Therefore, it requires extra planning.
Cost of Toe Kick and Base Trim
Quarter round at the floor costs $0.50 to $1.50 per linear foot. Meanwhile, decorative furniture feet cost $15 to $80 each. Consequently, simple trim is cheap while decorative feet add up. The average kitchen toe kick panel material costs $50 to $200. Therefore, budget accordingly based on your design goals.
Cabinet End Panel Trim Options
The exposed ends of your cabinets need finishing. Specifically, bare cabinet sides look cheap. Therefore, adding end panels is crucial. In addition, panels tie the whole design together. Also, they provide a surface for additional molding. Ultimately, you must choose the right style for your kitchen.
Finished End Panels
First, a finished end panel is an applied panel that covers the exposed side. Second, it matches the cabinet door finish. Typical thickness is a 0.25 inch plywood or thermofoil panel. Specifically, it is glued and finish nailed to the exposed end. Therefore, it creates a seamless look. Ultimately, it is the standard method for modern kitchens.
Beadboard End Panels
First, beadboard is a vertical grooved panel. Second, it is applied to cabinet ends for a cottage or farmhouse look. See more about beadboard kitchen cabinets. Specifically, it is painted white or painted to match the cabinet color. It is usually cut from 4×8 beadboard plywood sheets. Therefore, it is a very cost effective upgrade.
Decorative Pilasters
First, a decorative pilaster is a vertical decorative column. Second, it is applied to the cabinet end between base and upper cabinets. Specifically, it adds a furniture like leg detail. Also, it is common in traditional and transitional kitchen designs. Learn more about kitchen cabinet door styles that pair well with pilasters. Therefore, it creates a highly custom appearance. Check out more styles at Wayfair.
Kitchen Cabinet Trim Cost Summary Table
Comparing costs helps you plan your budget. Specifically, the table below outlines material and labor expenses. Also, it details the DIY difficulty level. Therefore, you can decide which projects to tackle yourself. In addition, it ranks the visual impact. Ultimately, this helps prioritize your spending.
Cost Breakdown
| Trim Type | Material Cost per LF | Total Material Avg Kitchen | Labor Cost | DIY Difficulty | Visual Impact |
|---|---|---|---|---|---|
| Crown Molding | $1.50 to $8 | $80 to $400 | $400 to $1,200 | Advanced | Very High |
| Light Rail | $1.50 to $4 | $50 to $200 | $200 to $600 | Intermediate | High |
| Scribe Molding | $0.50 to $2 | $20 to $80 | Included | Beginner | Medium |
| Toe Kick Quarter Round | $0.50 to $1.50 | $20 to $60 | Included | Beginner | Low to Medium |
| End Panels | $30 to $100 per panel | $100 to $400 | $200 to $500 | Intermediate | High |
FAQ
Many homeowners have questions about trim. Specifically, the options can be confusing. Therefore, we compiled the most common queries below. Also, we provided clear and direct answers. In addition, we linked to further resources. Ultimately, this section should clear up any remaining confusion.
What is the trim on top of kitchen cabinets called?
First, it is called crown molding. Second, it bridges the gap between the top of the cabinet and the ceiling. Specifically, it creates a built in furniture appearance. Therefore, it is highly recommended for a finished look.
Do you have to use crown molding on kitchen cabinets?
First, no. Second, many modern and transitional kitchens run cabinets to the ceiling instead. Also, crown molding is completely optional. However, it significantly improves the finished appearance in traditional and transitional kitchens. Therefore, consider your overall design style.
What is the strip at the bottom of upper cabinets?
First, it is called light rail molding. Second, it covers the underside of the cabinet box. Specifically, it hides under cabinet lighting hardware. Therefore, it provides a clean and finished edge. If you plan to how to paint kitchen cabinets, always paint the light rail simultaneously.
What is scribe molding on kitchen cabinets?
First, it is a thin flexible strip. Second, it is applied to the cabinet end where it meets an uneven wall. Specifically, it covers the gap without requiring the wall to be perfectly plumb. Therefore, it is an essential installation detail.
How much does it cost to add trim to kitchen cabinets?
First, crown molding costs $500 to $1,600 installed. Second, light rail costs $250 to $800 installed. Specifically, a full trim package runs $800 to $2,500 for a complete kitchen. Therefore, you must budget accordingly for professional results.
Advanced Tips for Kitchen Trim Installation
Installing trim requires significant patience. First, you must always measure twice before cutting. Second, ensure your saw blade is sharp. Specifically, a dull blade splinters the wood. Therefore, invest in a high quality finish blade. In addition, practice coping cuts on scrap wood first. Ultimately, this saves expensive material.
Choosing the Right Fasteners
First, never use large framing nails. Second, use an eighteen gauge brad nailer. Specifically, brad nails leave tiny holes. Therefore, they are easy to fill and hide. In addition, you should use wood glue on all joints. Ultimately, the glue provides the actual holding power over time.
Managing Wood Movement
First, wood naturally expands and contracts. Second, humidity changes cause this movement. Specifically, miters can open up during winter. Therefore, secure your joints tightly. In addition, pre paint your molding before installation. Ultimately, this hides any shrinkage lines that might appear later.
Working with Crooked Ceilings
First, ceilings are almost never level. Second, installing crown molding against a wavy ceiling is frustrating. Specifically, you must use a float method. Therefore, secure the molding level and fill the top gap with caulk. In addition, painted ceilings hide caulk perfectly. Ultimately, this trick creates the illusion of a perfectly straight ceiling.
Dealing with Out of Square Corners
First, room corners are rarely perfectly ninety degrees. Second, cutting standard miters often leaves a gap. Specifically, you must use an angle finder. Therefore, measure the exact angle before cutting. In addition, adjust your saw to split the difference. Ultimately, this ensures a tight fit on outside corners.
Painting and Finishing the Trim
First, always fill nail holes with a premium wood filler. Second, sand the filler smooth once it dries. Specifically, use fine grit sandpaper. Therefore, the patched area blends perfectly. In addition, caulk all seams where trim meets the wall or ceiling. Ultimately, a good paint job hides all installation evidence.
Maintaining Your Kitchen Trim Over Time
Kitchen trim requires routine maintenance. First, dust settles easily on top ledges. Second, grease from cooking accumulates quickly. Specifically, this happens on upper cabinets. Therefore, you must clean them regularly. In addition, use a gentle degreaser. Ultimately, harsh chemicals ruin the painted finish.
Repairing Dents and Scratches
First, baseboards take heavy abuse from vacuums. Second, shoes constantly kick the toe kick area. Specifically, this causes chips and dents. Therefore, keep touch up paint handy. In addition, you can fill deep gouges with wood putty. Ultimately, prompt repairs keep your kitchen looking brand new.
Dealing with Water Damage
First, kitchens are wet environments. Second, toe kicks near sinks often sustain water damage. Specifically, MDF swells heavily when wet. Therefore, seal the bottom edge with silicone. In addition, wipe up spills immediately. Ultimately, preventing water intrusion is the best strategy.
Updating Trim Styles
First, kitchen trends evolve over time. Second, heavy ornate molding looks outdated quickly. Specifically, flat and simple profiles are currently popular. Therefore, replacing old trim instantly modernizes a space. In addition, replacing trim is cheaper than replacing cabinets. Ultimately, it is a smart renovation choice.
Conclusion on Kitchen Cabinet Molding
Adding the right trim completely elevates your kitchen. First, crown molding provides elegance. Second, light rail adds polish and function. Specifically, scribes and baseboards ensure a flawless fit. Therefore, you should not skip these details. In addition, the investment pays off visually. Ultimately, trim is the jewelry of your kitchen cabinets.
Final Checklist Before Purchasing
First, double check all your measurements. Second, order ten percent extra material for waste. Specifically, mistakes happen during cutting. Therefore, having extra prevents project delays. In addition, verify your paint match beforehand. Ultimately, preparation guarantees a smooth and successful trim installation project.
When to Hire a Professional
First, assess your personal skill level honestly. Second, complex angled ceilings require advanced carpentry. Specifically, coped joints are difficult for beginners. Therefore, hire a professional if you feel unsure. In addition, pros finish the job much faster. Ultimately, the labor cost is worth the flawless result.