In addition, installing a cabinet filler strip is one of the most critical finishing steps in professional kitchen remodeling. Cabinet boxes are rigid, perfectly square factory modules manufactured in 3-inch width increments. Furthermore, in contrast, residential drywall walls are rarely flat, plumb, or square. A cabinet filler bridges the dimensional gap between your cabinet face frame and the wavy drywall. In addition, it provides essential clearance so cabinet doors, drawers. In addition, appliance handles can open fully without colliding into perpendicular walls or door casings.
In addition, omitting fillers or installing them improperly causes chronic headaches. Without adequate filler clearance, full-overlay drawer fronts scrape against window trim. In addition, corner cabinet pulls crash into neighboring doors. Furthermore, in this detailed masterclass, we explain filler width calculations, scribing techniques, pocket cleat fastening. In addition, specialized blind corner installations so your kitchen looks custom-built.

Why Cabinet Fillers Are Structurally and Functionally Necessary
In addition, many novice remodelers wonder why cabinet manufacturers do not simply build boxes that touch the wall directly. Understanding the engineering reasons behind cabinet fillers prevents costly installation mistakes.
Door and Drawer Pull Clearance Against Perpendicular Walls
In addition, the primary functional purpose of a cabinet filler is providing operating clearance for cabinet doors and drawers. When a cabinet box is mounted directly tight against an intersecting wall, the cabinet door cannot swing open past 80 or 85 degrees. The decorative hardware handle collides directly with the drywall before reaching a full 90-degree swing.
Furthermore, internal roll-out pantry trays and slide-out wire baskets require doors to open to at least 90 degrees to slide forward. In addition, if the door cannot open fully, the roll-out tray will crash into the door hinges and inner stiles. Placing a 2-inch or 3-inch filler strip between the cabinet and wall provides plenty of clearance for door pulls, allowing roll-out accessories to glide smoothly.
Compensating for Out-of-Square and Out-of-Plumb Drywall
In addition, drywall corners almost always accumulate heavy layers of joint compound and corner tape. This mud buildup creates rounded, bulging corners that bow out of square. Furthermore, if you push a flat, square cabinet against a bulging corner, a wide, tapered gap forms along the cabinet side.
In addition, a hardwood cabinet filler allows you to scribe and cut the strip to match the exact wavy contour of the drywall. When scribed correctly, the front face of the filler sits flush with your cabinet face frame while the back edge molds tightly to the plaster. This tailored fit eliminates messy caulk lines and creates an architectural furniture finish.
Standardizing Cabinet Widths to Fit Fixed Architectural Spans
In addition, standard manufactured kitchen cabinets are built in 3-inch increment modules: 12, 15, 18, 21, 24, 27, 30, 33. In addition, 36 inches wide. However, residential room dimensions rarely match these round numbers. For example, a kitchen wall might measure 124.5 inches between corner walls.
In addition, combining standard cabinets might total 120 inches of box width. This leaves a 4.5-inch void. Furthermore, splitting this remaining space into two 2.25-inch cabinet fillers positioned symmetrically at each end of the run centers the cabinetry perfectly. This symmetry balances the alignment of cooktops and sink base cabinets under central kitchen windows.
Dishwasher and Blind Corner Return Support
In addition, under-counter dishwashers do not have cabinet sidewalls. They are standalone appliances designed to slide into a 24-inch wide cavity between two cabinet boxes. Furthermore, when a dishwasher sits at the very end of a cabinet run, there is no cabinet box to support the heavy countertop above.
In addition, in this end-of-run layout, installers build an end-panel assembly using a vertical 3/4-inch plywood panel capped with a 3-inch cabinet filler. The filler attaches to the front edge of the panel. Furthermore, this creates a sturdy matching face frame that carries the dead weight of granite or quartz countertops safely.
Standard Cabinet Filler Dimensions and Types
In addition, cabinet manufacturers produce several styles and widths of filler trim to match their door finishes and box construction types.
| Filler Profile | Nominal Dimensions | Core Material | Primary Application | Contractor Notes |
|---|---|---|---|---|
| Standard Base Filler | 3″ W x 34.5″ H x 3/4″ D | Solid matching hardwood | Base cabinet wall terminations | Can be ripped down to fit |
| Standard Wall Filler | 3″ W x 30″/36″/42″ H x 3/4″ D | Solid matching hardwood | Upper wall cabinet terminations | Match upper cabinet height |
| Extended Tall Filler | 3″ or 6″ W x 96″ H x 3/4″ D | Hardwood or veneer core | Pantry & refrigerator surrounds | Cut to ceiling datum line |
| Fluted Architectural Filler | 3″ or 6″ W x 34.5″ H x 3/4″ D | Solid carved hardwood | Cooktop surrounds & decorative breaks | Cannot be ripped without spoiling flutes |
| Frameless Overlay Filler | 3″ W x 34.5″ H with edge banding | Plywood or MDF with thermofoil | European full-access cabinetry | Requires front edge-banding tape |
1.5-Inch vs 3-Inch Standard Hardwood Fillers
In addition, standard framed cabinetry lines generally stock fillers in two nominal widths: 1.5 inches and 3 inches. A 1.5-inch filler matches the exact width of a standard face frame stile. Furthermore, it is used when wall clearance needs are modest and minimal scribing is required.
In addition, conversely, 3-inch fillers represent the most versatile choice on job sites. A 3-inch blank provides ample timber for scribing severe drywall runouts. Furthermore, if a wall leans out of plumb by 1/2 inch from ceiling to floor, an installer can scribe the filler from 2.5 inches at the top down to 2 inches at the bottom. This ensures sufficient wood remains to join the cabinet face frame securely.
Extended 6-Inch Architectural and Fluted Fillers
In addition, for high-end traditional and transitional kitchen designs, manufacturers offer wide 6-inch architectural fillers. These wider components often feature decorative CNC fluting, reeding, or beadboard grooves.
In addition, designers utilize 6-inch fluted fillers to frame majestic range hoods or flanking cooktop pull-out spice cabinets. When topped with carved decorative corbels and matching rosettes, wide fillers break up long monotonous runs of Shaker doors. Furthermore, this creates the visual appearance of custom furniture hearths.
Overlay Filler Strips for Frameless European Cabinetry
In addition, frameless European-style cabinetry (full access boxes) does not utilize hardwood face frames. Instead, cabinet doors and drawer fronts cover the entire front edge of the box. This leaves narrow 1/8-inch reveal gaps between components.
In addition, when installing fillers on frameless cabinets, standard flat fillers look recessed and awkward. To solve this, installers build an overlay filler assembly. Furthermore, they attach a continuous edge-banded wood strip to a sub-block so the front surface of the filler sits flush with the plane of the adjacent cabinet doors. This alignment maintains continuous horizontal sightlines across the kitchen.
Base vs Wall vs Tall Pantry Height Fillers
In addition, cabinet fillers must match the vertical height of the cabinets they accompany. Base cabinet fillers measure exactly 34.5 inches tall, aligning with the bottom edge of the face frame down to the floor.
In addition, upper wall fillers ship in standard heights of 30, 36. In addition, 42 inches to match corresponding wall cabinet sizes. Meanwhile, tall pantry and refrigerator enclosure fillers measure 84, 90, or 96 inches in length. When installing tall fillers, you must secure internal blocking every 24 inches along the wall to prevent the long timber strip from bowing over time.
Calculating Minimum Clearance to Prevent Door Binding
In addition, determining the exact width of your cabinet filler is a matter of practical geometry. Guessing filler width often results in doors that scrape walls or drawers that refuse to open.
| Cabinet Overlay Style | Hardware Projection | Minimum Recommended Filler Width | Worst-Case Failure Mode |
|---|---|---|---|
| Standard Partial Overlay | 1-Inch knob or bar pull | 1.5 Inches | Knob strikes drywall at 85 degrees |
| Full Overlay (Framed) | 1.25-Inch tubular bar pull | 2.0 Inches to 2.5 Inches | Door edge scrapes wall casing trim |
| Frameless (European) | 1.5-Inch projection handle | 2.5 Inches to 3.0 Inches | Drawer box binds against wall surface |
| 90-Degree Blind Corner | Contrasting door pulls | 3.0 Inches on each corner axis | Handles collide when both doors open |
Full Overlay Door Clearance Requirements (The 90-Degree Swing Test)
In addition, in full-overlay cabinetry, the door covers nearly the entire face frame, extending to within 1/8 inch of the box outer edge. When the door swings open, its outer corner arcs outward past the edge of the cabinet box.
In addition, if you install a full-overlay cabinet tight against a wall without a filler, the outer edge of the door binds against the wall immediately. As a general rule, full-overlay cabinets require a minimum filler width of 2 inches. Furthermore, if your doorway features thick decorative window casing or 1-inch thick baseboards, you must add the thickness of that trim to your filler calculation.
Deep Hardware Pull and Handle Projections (1-Inch to 1.5-Inch Clearances)
In addition, never calculate filler width based solely on the door thickness. You must factor in the physical projection of your cabinet hardware handles. Furthermore, modern bar pulls and appliance handles project 1 inch to 1.75 inches away from the door face.
When a door swings open toward an adjacent wall, the tip of the handle strikes the drywall before the door reaches a 90-degree angle. In addition, if the door cannot reach 90 degrees, interior pull-out trash bins and sliding shelves will collide with the door. Ensure your filler width exceeds your handle projection by at least 1/2 inch to create a safe buffer zone.
Refrigerator Panel and Wall-Oven Clearances
In addition, deep appliances such as built-in wall ovens and full-depth refrigerators project past the 24-inch depth of standard base cabinets. A typical refrigerator door measures 3 to 4 inches thick and swings outward in a wide arc.
In addition, if base cabinets sit directly beside a deep refrigerator enclosure panel, opening adjacent base cabinet drawers can scrape the protruding refrigerator door gasket. Installing a 3-inch filler between the base cabinet and the refrigerator panel pushes the drawer outward. Furthermore, this offset allows drawers to extend smoothly without contacting the refrigerator.
Blind Corner Cabinet Clearance Math
In addition, blind corner base cabinets sit in 90-degree corner junctions, extending hidden storage into the corner void. A blind corner cabinet must be pulled out from the corner wall by several inches. Furthermore, this leaves an open corner gap.
In addition, to join the perpendicular cabinet run cleanly, you must install two intersecting fillers that form a 90-degree corner post. The combined clearance of these fillers must prevent drawers in the adjoining cabinet from hitting the handles on the blind corner door. Furthermore, standard industry practice requires a minimum of 3 inches of clear filler space in both directions.
Scribing a Cabinet Filler to Irregular Drywall Step-by-Step
In addition, scribing is the process of transferring the unique, irregular contours of a building wall onto a piece of wood trim. Executing this process cleanly separates amateur carpentry from master craftsmanship.
Step 1: Clamping the Raw Filler Blank to the Face Frame
In addition, begin by cutting your 3-inch hardwood filler blank to the exact vertical height of the cabinet face frame. Do not attempt to hold the wood in place with your fingers while marking. Hand movement introduces measurement errors.
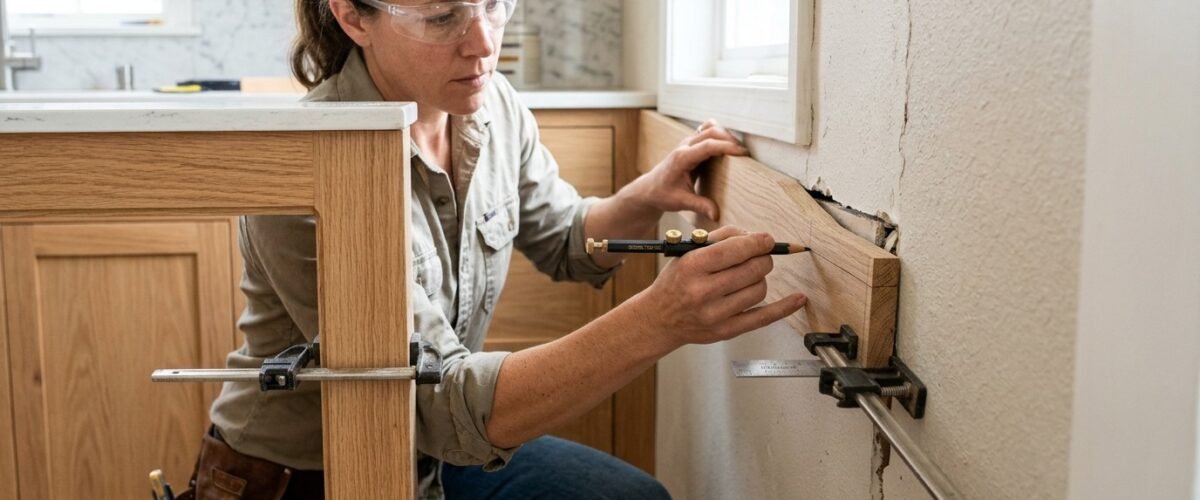
In addition, use two padded quick-grip clamps to secure the filler blank firmly to the cabinet face frame stile. Position the filler so it overlaps the wall gap, keeping its outer face parallel to the cabinet front. Verify that the cabinet box itself sits completely plumb and level before scribing.
Step 2: Setting and Dragging the AccuScribe Tool
In addition, professional carpenters utilize specialized scribing tools such as the FastCap AccuScribe or a precision brass compass. Measure the widest gap between the filler strip and the drywall wall. Furthermore, adjust your scribing tool legs so the distance between the metal tracking tip and the pencil point equals that maximum gap plus 1/16 inch.
In addition, hold the flat guide tip of the scribing tool tight against the drywall. Keep the tool completely level and perpendicular to the wall. Furthermore, drag the tool downward in a slow, continuous motion from the top of the cabinet to the floor. The pencil will transfer every bump, depression. In addition, tape wave from the drywall directly onto the face of the wood filler.
Step 3: Back-Beveling the Cut Line at 5 to 7 Degrees
In addition, remove the clamped filler and take it to your workbench for cutting. If you cut the pencil line with a standard 90-degree vertical saw blade, the rear corner of the timber might hit drywall high spots first. This prevents the front face from touching the wall tightly.
In addition, to guarantee a razor-tight seam, tilt the base of your jigsaw or track saw to a 5-degree or 7-degree back bevel. Cut along the waste side of the pencil line, angling the blade so the back edge of the wood strip is slightly narrower than the front face. Furthermore, this relief cut ensures that only the front finished face makes contact with the drywall.
Step 4: Fine-Tuning the Edge with 80-Grit Sandpaper
In addition, saw blades inevitably leave minor tooth marks and subtle wavers along the cut line. Take a belt sander, block plane, or random orbital sander loaded with 80-grit abrasive and sand the bevel cut right down to the pencil line.
In addition, take care not to round over the sharp front corner edge of the filler. Maintaining a crisp 90-degree front edge ensures that when the wood meets the painted drywall, the junction forms an unbroken hairline seam that requires zero messy latex caulk.
Step 5: Test-Fitting the Dry Joint Before Final Fastening
In addition, hold the scribed filler back in place against the wall and cabinet face frame. Inspect the entire vertical seam from top to bottom. Furthermore, if any drywall high spots hold the filler away from the wall, mark the contact point with a pencil.
In addition, take the filler back to your sanding block and remove a hair of timber from the high spot. Repeat this dry-fitting process until the scribed wood edge sits flush along the entire wall length without forcing or bowing the cabinet box.
Fastening and Securing Cabinet Fillers
In addition, once your filler strip is scribed and test-fitted, securing it firmly is essential. Because fillers face continuous pulling force from opening doors, the joint must remain rock-solid.
| Fastening Technique | Fastener Type | Structural Strength | Visual Concealment | Best Application |
|---|---|---|---|---|
| Pocket Hole Screws | #7 x 1-1/4″ Fine Thread Pocket Screws | Very High | Completely hidden from view | Contractor standard behind stiles |
| Plywood Backer Cleat | #8 x 1-1/2″ Wood Screws + PVA Glue | Maximum | Hidden inside cabinet void | Wide fillers over 2 inches |
| Trim Head Screws | #7 x 2-1/4″ Trim Head Screws | High | Countersunk behind hinge plates | Face frame to face frame joints |
| 18-Gauge Brad Nails | 1-1/4″ Galvanized Brad Nails | Low (Prone to popping) | Visible tiny nail holes | Temporary positioning only |
Building Internal Plywood Support Backer Cleats
In addition, a filler strip attached only along its front edge will flex when kicked or bumped. To provide solid structural backing, professional installers mount a continuous wood support cleat behind the filler.
In addition, cut a strip of 3/4-inch plywood measuring roughly 2 inches wide and the full height of the cabinet. Screw and glue this backer cleat to the cabinet box sidewall, positioning it recessed exactly 3/4 inch back from the front face frame plane. Furthermore, this cleat provides a solid timber foundation to anchor the rear face of the filler strip.
Pocket Hole Fastening Behind the Face Frame Stile
In addition, the cleanest way to join a hardwood filler to a cabinet face frame is utilizing pocket hole joinery. Drill three pocket pilot holes along the back inside edge of the filler strip using a Kreg pocket hole jig, spacing them 8 to 10 inches apart.
In addition, clamp the filler to the cabinet face frame using face-aligning locking clamps to ensure the front faces sit dead flush. Drive 1-1/4 inch fine-thread pocket hole screws through the rear pocket holes into the cabinet face frame stile. Furthermore, this creates an invisible joint with zero exposed screw holes on the front finished face.
Joining Flush to Frameless Boxes with Dowels or Pocket Screws
In addition, in frameless European cabinetry, there is no face frame stile to pocket-screw into. Instead, installers screw through the interior cabinet sidewall directly into the side of the filler sub-block.
In addition, pre-drill pilot holes through the cabinet box sidewall, countersinking the screw heads inside the cabinet interior. Drive 1-1/4 inch wood screws into the backer block, clamping the assembly tightly until the front edge-banded filler aligns flush with neighboring door faces. Furthermore, snap matching plastic cover caps over the interior screw heads for a neat appearance.
Blind Nailing vs Screw Fastening for Seamless Visuals
In addition, never drive finish nails straight through the front face of a stained hardwood cabinet filler. Filling face nail holes with wax putty leaves visible round blemishes that catch the light and look sloppy.
In addition, if you cannot access the back of the filler to drive hidden screws, utilize blind nailing techniques. Drive 18-gauge brad nails at steep 45-degree angles through the bottom edge of the filler where toe kick molding will cover them, or through the top edge beneath countertop overhangs. For painted cabinets, use small-head trim screws countersunk 1/16 inch and fill with two-part wood filler before touch-up painting.
Specialized Filler Applications in Complex Kitchen Layouts
In addition, certain kitchen layout scenarios require specialized filler configurations to maintain structural integrity and visual harmony.
Dishwasher Return Panels and End-of-Run Fillers
In addition, when a dishwasher terminates a cabinet run against an open room, you must build an integrated dishwasher end panel. The dishwasher requires an uninterrupted 24-inch clear opening between the neighboring cabinet and the end panel.
In addition, attach a 3-inch wide base filler to the front edge of a 3/4-inch plywood end panel. This creates an L-shaped corner stile. Furthermore, fasten the bottom of the panel to an anchored floor sleeper. In addition, screw the top into a continuous plywood countertop sub-base. This heavy-duty assembly prevents the end panel from wobbling when the dishwasher door latches shut.
Corner Cabinet 90-Degree L-Joint Fillers
In addition, in L-shaped and U-shaped kitchens, blind corner base cabinets require two perpendicular fillers joined together at a 90-degree angle. This assembly creates an internal corner post that separates intersecting drawer banks.
In addition, cut two matching filler strips and bevel their joining edges at 45 degrees, or build a simple butt-joint using wood glue and pocket screws. Fasten the corner post securely to the blind corner cabinet box. Furthermore, this corner assembly guarantees that pull-out drawers on one wall can extend fully without colliding with handles on the adjoining wall.
Upper Crown and Light Rail Transition Fillers
In addition, when installing tall upper crown molding that reaches the ceiling, wall runouts become magnified. If a kitchen ceiling slopes by 1/2 inch across an 8-foot run, nailing crown molding directly to cabinet tops produces an awkward crooked shadow line.
In addition, installers solve this by attaching a flat hardwood riser filler strip directly above the upper cabinet face frame. The flat riser absorbs the ceiling slope through custom scribing, providing a level, straight baseline for mounting the decorative crown molding profile cleanly.
Tall Pantry and Wall Oven Cabinet Lateral Fillers
In addition, full-height pantry cabinets and built-in double oven towers stand 84 to 96 inches tall. Because these tall cabinets span from floor to ceiling, wall bowing is especially noticeable along their long vertical edges.
In addition, always specify continuous 3-inch tall fillers for pantry enclosures. Scribe the entire 8-foot length to the drywall contour. In addition, secure internal blocking blocks every 24 inches behind the strip. Furthermore, this sturdy backing prevents tall cabinet boxes from racking when loaded with hundreds of pounds of canned pantry goods.
Showroom and Job Site Quality Inspection Tests
Before signing off on cabinet installation and installing countertops, run these simple physical tests to verify that every cabinet filler meets professional standards.
The 90-Degree Door Clearance Test
In addition, open every cabinet door and drawer adjacent to a filler strip fully. Every door must swing open to at least 90 degrees without its decorative handle touching the wall or door trim.
Next, pull all internal roll-out shelves and trash bins forward to their full extension. In addition, the sliding wire baskets and wooden drawers must clear the opened doors without rubbing against hinges or rubber bumpers. If binding occurs, the filler width must be expanded before countertop installation.
The Flush Seam Finger Drag Test
In addition, drag your bare fingertip across the vertical seam between the cabinet face frame and the filler strip. The joint should feel completely smooth, flat. In addition, continuous, like a single piece of custom milled timber.
In addition, if you feel a noticeable ridge or offset between the two pieces of wood, the filler is misaligned. Loosen the pocket screws, apply face-clamping pressure to bring the stiles flush. In addition, re-tighten fasteners securely.
The Joint Separation and Caulking Audit
In addition, inspect the scribed junction where the wood filler meets the drywall wall. In high-end craftsmanship, the wood contacts the plaster cleanly with zero visible gaps larger than 1/32 inch.
In addition, never rely on thick beads of silicone caulk to hide poor scribing. Thick caulk joints shrink, crack. In addition, collect grease and dust over time. Furthermore, if a gap exceeds 1/16 inch, remove the filler and re-scribe a fresh timber blank for a proper architectural fit.
Filler Strips, Trim Molding, Brackets, and Pull-Outs: The Finishing Pieces
A filler strip never works alone. It meets trim molding at the top, brackets where a run ends, and pull-out hardware inside the base cabinets it sits beside. Knowing how these pieces fit together is what makes the finished run look like one unit instead of separate parts.
Kitchen Cabinet Trim Molding and Light Rail Molding for Kitchen Cabinets
Kitchen cabinet trim molding is the decorative molding that covers the joints between cabinets, walls, and ceilings, and the filler strip is often the piece the trim attaches to. Light rail molding for kitchen cabinets is the molding fixed under wall cabinets to hide under-cabinet lights and the bottom edge of the cabinet box. Where a filler strip runs up to a wall cabinet, the light rail molding has to be cut to meet it cleanly, or the gap shows. See our Kitchen Cabinet Trim Molding guide for profiles and installation.
Cabinet Brackets Where a Filler Run Ends
Cabinet brackets support open shelves, countertop overhangs, and the ends of a cabinet run where a filler strip finishes the line. If your run ends with a filler and an open shelf or an extended counter, the bracket carries the load the filler cannot. See our Cabinet Brackets guide for weight ratings and spacing.
Base Cabinet Pull Out Clearance Beside Fillers
A base cabinet pull out is a sliding tray, basket, or trash bin that pulls out of a base cabinet, and it needs clearance that a filler strip can provide. If a pull-out sits next to a wall or an appliance, a 1.5-inch or 3-inch filler gives the handle and the sliding hardware room to clear. Without it, the pull-out binds against the wall every time it opens. See our Pull-Out Trash Bin Cabinets guide for pull-out sizing.
Frequently Asked Questions About Cabinet Fillers
What is the standard size of a cabinet filler?
In addition, standard manufactured cabinet fillers are 3 inches wide and 3/4 inch thick. They are available in heights of 30, 36. In addition, 42 inches for upper wall cabinets, 34.5 inches for base cabinets. In addition, 84 to 96 inches for tall pantry cabinets.
Do you always need a filler between a cabinet and a wall?
In addition, yes, you almost always need a filler strip between a cabinet and an intersecting wall. Fillers provide clearance for door handles and drawer fronts to open without hitting drywall or decorative door casing trim.
How do you attach a cabinet filler without visible screws?
In addition, attach cabinet fillers by drilling pocket holes on the back edge of the filler or by securing a 3/4-inch plywood backer cleat to the cabinet box. Screwing from behind pulls the filler tight without exposed face screws.
What angle should you back-bevel a scribed filler strip?
In addition, cut scribed filler strips with a 5-degree to 7-degree back bevel using a jigsaw or track saw. This relief cut ensures that only the front finished face contacts the wall. Furthermore, this creates a tight seam without binding.
Can you install a dishwasher next to a wall without a cabinet?
Yes. However, you must build an end-panel assembly using a 3/4-inch plywood panel capped with a 3-inch base filler. In addition, the filler and panel provide essential structural support to carry the heavy countertop above the dishwasher.
What is the difference between a filler strip and trim molding?
A filler strip fills a gap between a cabinet and a wall or appliance so doors and drawers can open, while trim molding is decorative molding that covers joints and edges. They often meet: the filler closes the gap, and the trim molding finishes the seam where the filler meets the wall or the cabinet.
What is light rail molding for kitchen cabinets?
Light rail molding for kitchen cabinets is the molding fixed under wall cabinets to hide under-cabinet lights and the bottom edge of the cabinet box. It runs along the bottom of the uppers and is cut to meet filler strips and end panels cleanly.
Related Guides
Filler strips go in during installation — see Installing Base Cabinets and Installing Kitchen Cabinets. For the heights they sit at, see Base Cabinet Height, and for the bottom of the run, see Toe Kick Cabinet.