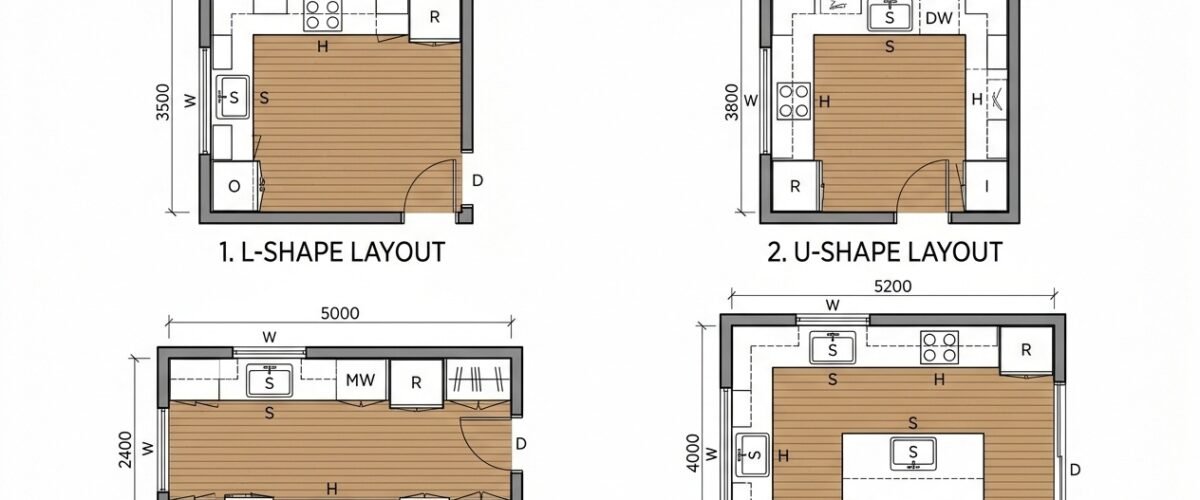
The best kitchen cabinet layout depends on the room square footage, the number of cooks, and the location of existing plumbing and windows. First, you must evaluate these structural factors before selecting a design. Because the four most common layouts are L shape, U shape, galley, and single wall, each has a specific ideal room size for maximum efficiency. Specifically, moving plumbing or windows changes the layout cost dramatically during a renovation. Therefore, keeping utilities in their original location saves significant money. Ultimately, a good design maximizes storage without crowding the room.
Many homeowners struggle to choose the right configuration for their specific floor plan. However, understanding how each layout functions can simplify the decision process. In addition, you must consider the walking paths through the room. Because kitchens serve as central gathering spaces, traffic flow is just as important as storage capacity. Consequently, analyzing your daily routines helps determine which design suits your lifestyle. For example, avid bakers need different configurations than people who primarily reheat meals.
The Work Triangle and Kitchen Cabinet Layout
What the Work Triangle Is
The traditional work triangle connects the refrigerator, sink, and stove in a geometric pattern. Specifically, each leg of this triangle should measure four to nine feet in length. Consequently, the total perimeter should range from thirteen to twenty six feet for maximum efficiency. If the triangle is too small, people trip over each other during meal preparation. Conversely, a triangle that is too large causes unnecessary walking while cooking.
Architects developed this concept decades ago to streamline kitchen workflows. Because it remains highly effective, most designers still use it as a foundational guideline. Therefore, you should map out this triangle on your floor plan early in the process. Furthermore, ensure no major obstacles block the paths between these three vital workstations. Ultimately, a clear work triangle makes daily cooking tasks significantly easier and faster.
How Layout Affects the Work Triangle
L shape and U shape designs optimize the triangle naturally by placing appliances on intersecting walls. In contrast, a galley configuration compresses the triangle into a parallel corridor between two cabinet runs. However, island designs can break the triangle if the island interrupts the main walking path. Therefore, always map out the steps between your stove, sink, and fridge carefully.
Certain room shapes make forming a perfect triangle impossible. For example, single wall designs completely flatten the triangle into a straight line. As a result, you must adjust your expectations based on the physical limitations of the space. Nevertheless, you can still achieve a highly functional workspace by grouping related tasks together. In short, adapt the triangle concept to fit your specific room architecture.
Modern Work Zone Approach
Modern design often replaces the strict triangle with specific dedicated work zones. For example, a modern kitchen typically features a prep zone, cooking zone, cleaning zone, and storage zone. First, group your dry goods and pantry storage near the refrigerator. Second, place the cleaning zone directly around the sink and dishwasher for easy loading. Finally, position the cooking zone near the stove and ovens.
This zone approach works exceptionally well in larger spaces with multiple cooks. Because each zone functions independently, two people can work simultaneously without interference. Moreover, your cabinet placement directly defines each of these crucial zones. Thus, you must specify your storage needs before finalizing the overall configuration. Check out options at Wayfair to equip these specific zones properly.
L Shape Kitchen Cabinet Layout
What It Is and When It Works
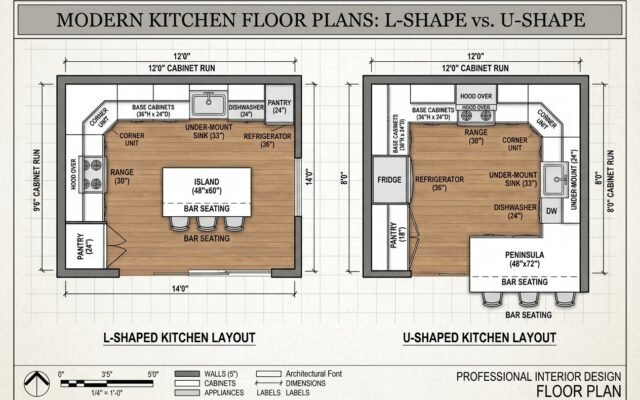
An L shape design features two perpendicular cabinet runs meeting in a single corner. Because it fits seamlessly into most open spaces, it is the most common layout in North American homes. Specifically, it works best for rooms measuring ten by ten to fifteen by fifteen feet. In addition, this configuration easily accommodates a central dining table in medium sized rooms.
This design creates a natural work triangle without feeling enclosed or claustrophobic. Therefore, it remains a favorite choice for open concept floor plans. Furthermore, it allows traffic to bypass the main cooking area completely. Consequently, the cook can work uninterrupted while guests pass through the space. Ultimately, it offers a perfect balance of privacy and openness.
Corner Cabinet Options for L Shape
Corners present the biggest challenge in any L shape design strategy. First, a standard blind corner unit is cheap but incredibly hard to access. Second, a lazy Susan maximizes the available space but limits what you can actually store inside. Finally, a magic corner pull out offers the best access but costs significantly more money. Therefore, choose corner cabinet types based on your budget.
Many homeowners regret installing cheap corner solutions after struggling to reach pots and pans. Because corners consume a large footprint, wasting this space is a critical mistake. Thus, investing in premium organizers often pays off in daily convenience. Similarly, careful planning ensures you select the right mechanism for your specific storage needs.
L Shape with Island
Adding a freestanding island to an L shape requires careful spatial measurement. Specifically, you need a minimum forty two inch clearance on all sides of the island. If you lack this required space, the island will crowd the kitchen drastically. However, when it fits properly, it provides excellent secondary prep space.
An island also provides casual seating for family members and guests. Because it acts as a room divider, it helps define the cooking space in open plans. In addition, you can easily browse suitable kitchen island cabinets for these specific layouts. Consequently, a well planned island enhances both function and social interaction.
L Shape Cabinet Count and Linear Footage
A typical ten by ten L shape uses about twenty linear feet of cabinets. Because installation costs vary by region, expect to pay between two hundred and four hundred dollars per linear foot. Consequently, this translates to four thousand to eight thousand dollars in total cabinet expenses. Furthermore, upgrading to custom finishes or premium materials will push this estimate higher.
Always measure your walls twice before calculating the required linear footage. Specifically, include space for appliances when estimating your total cabinet needs. Because errors in measurement lead to costly delays, precision is absolutely essential. Ultimately, a detailed floor plan prevents expensive mistakes during the ordering process.
U Shape Kitchen Cabinet Layout
What It Is and When It Works
A U shape features three continuous walls of cabinets and countertops. Because it maximizes both storage and counter space, it is highly desirable for serious cooks. Specifically, this layout works best for kitchens measuring twelve by twelve or larger. However, it requires significant floor space to prevent the room from feeling cramped.
This configuration creates the most efficient work triangle possible. Therefore, everything you need remains within a few steps of the central standing area. In addition, it provides ample counter space for multiple appliances and extensive meal prep. Consequently, it remains incredibly popular in larger family homes.
The Peninsula vs Full U Shape
A peninsula effectively closes one end of a kitchen without requiring a solid interior wall. Because it works beautifully in open plan designs, it often replaces a third true wall. In addition, a peninsula easily doubles as a casual breakfast bar for quick meals. Therefore, it provides a highly functional boundary between the kitchen and the living room.
Many modern renovations remove a wall to replace it with a peninsula. As a result, the kitchen feels much larger while retaining essential storage capacity. Furthermore, the peninsula counter serves as a perfect buffet area during parties. Ultimately, it offers the benefits of a U shape without the enclosed feeling.
U Shape Traffic Flow
Traffic flow is critical when planning a U shape configuration. First, you must leave a minimum forty eight inch clearance between facing cabinet runs. Second, if you have two cooks, expand this clearance to sixty inches. Otherwise, multiple people will constantly bump into each other while working.
A narrow U shape quickly becomes frustrating during busy holiday cooking sessions. Because the entry point is restricted, traffic bottlenecks occur easily. Therefore, never force this layout into a space that is too narrow. In short, ample clearance ensures safety and comfort during daily meal preparation.
U Shape Cabinet Count
A typical U shape uses thirty to forty linear feet of cabinets. Because it utilizes three full walls, the total material cost is substantial. Consequently, expect to spend six thousand to sixteen thousand dollars installed, depending on the cabinet grade. If you need internal organizers, check current prices on Amazon for affordable insert options.
The high cabinet count provides unparalleled storage opportunities. For example, you can dedicate entire sections to baking supplies or small appliances. However, you must organize this vast space efficiently to avoid losing items in the back. Thus, investing in deep drawers and pull out shelves is highly recommended.
Galley Kitchen Cabinet Layout
What It Is and When It Works
A galley features two parallel runs of cabinets facing directly across from each other. Because it isolates the primary workspace, it offers maximum efficiency for single cook kitchens. Specifically, it works best for narrow rooms measuring seven to twelve feet wide. Furthermore, professional restaurant chefs often prefer galleys due to the tight, highly efficient work triangle.
This design eliminates corner cabinets entirely, which saves money and simplifies access. Therefore, every inch of a galley is fully utilized for functional storage. In addition, it naturally discourages through traffic if closed at one end. Consequently, the cook can focus entirely on preparation without interruptions.
Galley Minimum Clearances
Proper clearances make or break a galley design. First, maintain thirty six inches minimum between the facing runs. Second, for comfortable daily cooking, aim for forty two inches of clearance. Finally, forty eight inches is absolutely mandatory for two cooks. If the gap is too wide, the inherent efficiency of the galley is completely lost.
Opening appliance doors in a galley requires careful spatial planning. For example, an open oven door and an open dishwasher door can block the aisle completely. Because of this, stagger major appliances on opposite walls to avoid collisions. Ultimately, proper spacing ensures smooth operation during complex meal prep.
How to Maximize Storage in a Galley
Storage optimization is essential in a tight galley footprint. For example, extending floor to ceiling uppers utilizes vertical space effectively. In addition, incorporating pull out shelves for base cabinets ensures you can reach items tucked in the back. Moreover, toe kick drawers provide hidden flat storage for large baking sheets.
Because galleys lack wall space, you must make every cabinet count. First, evaluate exactly what you need to store before ordering units. Second, use tall pantry cabinets to consolidate dry goods in one location. Ultimately, smart internal organization compensates for the smaller overall footprint.
Galley vs Single Wall Layout
A galley essentially doubles the available counter space compared to a single wall design. However, a single wall is strictly necessary when a room is under seven feet wide. Because galleys provide significantly more storage, they are generally superior if physical space permits. Thus, always choose a galley over a single wall when the room width allows it.
Converting a single wall into a galley dramatically improves kitchen functionality. For example, adding a shallow run of twelve inch deep base cabinets opposite the main wall adds huge storage value. Consequently, you gain a serving counter without sacrificing too much floor space. In short, galleys offer much better utility.
Kitchen Island Layout
When an Island Works
An island requires a minimum twelve by twelve room size. Specifically, the island needs a forty two inch clearance on all surrounding sides. Furthermore, allow forty eight inches on main traffic paths leading to adjacent rooms. The minimum useful island size is twenty four inches deep by thirty six inches wide. Therefore, never force an island into a space that is simply too small.
A poorly placed island creates massive frustration by blocking natural pathways. Because it becomes a permanent obstacle, fixing the mistake is very expensive. Thus, tape the proposed island dimensions on your floor before ordering cabinets. Ultimately, this physical test reveals if the clearances are truly adequate.
Island with Sink or Cooktop
Adding plumbing or a gas line to an island significantly increases overall costs. For example, roughing in these utilities through the floor adds five hundred to two thousand dollars. In addition, a cooktop island requires an expensive, visually intrusive overhead vent hood. Consequently, you must budget carefully before moving major appliances away from the exterior walls.
Many homeowners prefer keeping the island clear for prep work and entertaining. Because a sink or stove consumes valuable surface area, a clear island is often more versatile. However, a prep sink in the island can dramatically improve workflow for multiple cooks. Therefore, weigh the utility against the substantial installation cost.
Waterfall Island Countertop
A waterfall edge features the countertop material wrapping down one or both ends of the island base. Because it requires significantly more stone slab material, it adds five hundred to two thousand dollars to the cost. However, it creates a stunning visual focal point in modern designs. Indeed, it also protects the vulnerable cabinet sides from scuffs and physical damage.
This design choice elevates the look of basic cabinets instantly. First, ensure your floor can support the extra weight of the stone panels. Second, hire an experienced fabricator to match the stone veins perfectly at the seams. Ultimately, a well executed waterfall edge is worth the premium price tag.
Island Cabinet Configuration
You can configure the island base with standard cabinets, drawer banks, or decorative open shelving. First, decide what specific items you need to store in this central location. Second, spec the interior with appropriate kitchen island base cabinets to maximize utility. Finally, you can browse various structural bases at Home Depot.
Deep drawer banks are exceptionally useful in an island configuration. Because they hold heavy pots and large bowls easily, they improve ergonomics significantly. In addition, placing the microwave in the island frees up valuable upper cabinet space. Consequently, customizing the island interior yields massive functional benefits.
Single Wall Kitchen Cabinet Layout
What It Is and When It Works
A single wall layout places all cabinets and appliances on one straight line. Specifically, it is the only viable option for very narrow rooms or small studio apartments. Because it works in spaces under seven feet wide, it is highly space efficient. However, it severely limits both available counter space and overall storage capacity.
This configuration completely flattens the traditional work triangle. Therefore, you walk in a straight line between the fridge, sink, and stove. While less efficient than a U shape, it is perfectly functional for simple meals. Ultimately, it preserves open living space in tiny homes.
Maximizing a Single Wall Layout
To compensate for limited base units, you must think vertically. For example, install tall pantry cabinets at each end of the run. In addition, utilize compact under counter appliances to free up precious surface area. Furthermore, extending wall cabinets to the ceiling provides essential supplementary storage.
Smart organization is critical when you only have one wall. First, use multi tiered inserts in every drawer. Second, install hanging rails for frequently used utensils. Ultimately, rigorous decluttering ensures the small space remains tidy and functional.
Single Wall with an Island or Table
You can vastly improve a single wall layout by adding a freestanding island opposite the cabinets. As a result, this essentially converts the single wall into a highly functional galley configuration. If a permanent island will not fit, a sturdy dining table provides necessary prep space. Therefore, adding a supplementary surface is highly recommended.
A movable cart offers another excellent solution for tight single wall spaces. Because you can roll it out of the way, it provides flexibility. In addition, it serves as a mobile prep station or serving cart during parties. Consequently, adaptable furniture solves many small kitchen problems.
Cabinet Layout Planning Step by Step
Step 1 Measure the Room
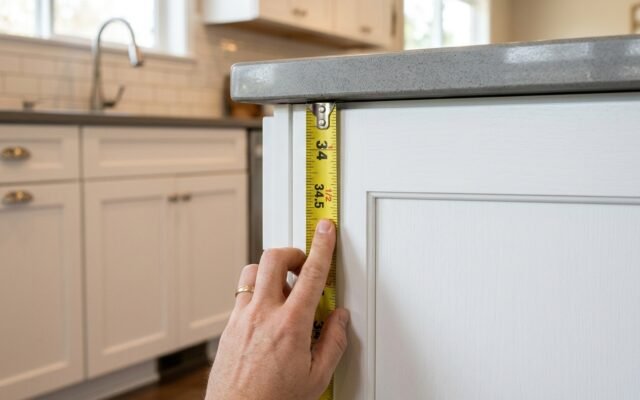
Accurate measurements are the absolute foundation of any successful layout. First, record the overall floor plan dimensions carefully. Second, note the exact locations of all windows and doors. Finally, mark the existing plumbing stub outs and gas line locations. Learning how to measure kitchen cabinets properly prevents disastrous ordering mistakes.
Always measure in inches, not feet, to ensure precision. Because cabinets are sold in three inch increments, exact dimensions are vital. Furthermore, note the ceiling height and any soffits that might restrict upper cabinets. Ultimately, a perfect floor plan saves time and money.
Step 2 Mark Fixed Points
Fixed utility points dictate where major appliances must go. Specifically, mark the sink, stove, and refrigerator locations on your drawing clearly. Because moving any of these utilities adds five hundred to three thousand dollars to the project, leaving them in place saves major money. Thus, plan your cabinet boxes around these existing anchor points.
If you must move a utility, prioritize moving electrical lines over plumbing. Because electrical wire is easier to route, it costs less to relocate. In contrast, moving a drain line often requires cutting into the floor joists. Therefore, work with your existing plumbing whenever possible.
Step 3 Determine Linear Footage Needed
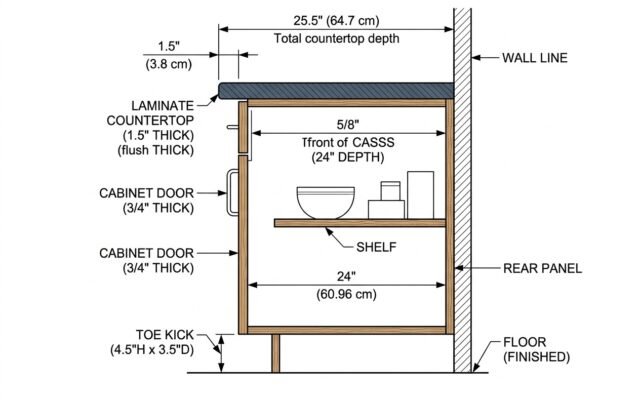
Count the required base cabinet runs in linear feet accurately. First, remember the standard base unit depth is twenty four inches. Second, the standard upper unit depth is twelve inches. Consequently, understanding these basic base cabinet dimensions helps you calculate the necessary floor space perfectly.
Do not forget to account for appliance widths in your linear footage calculations. For example, a standard stove requires thirty inches of space. In addition, refrigerators need thirty six inches plus door clearance. Ultimately, subtracting appliance widths gives you the true cabinet footage required.
Step 4 Plan Corner Solutions First
Corners are always the hardest part of any layout design. Therefore, solve your corner strategy before filling in the straight runs. Because corner cabinets dictate the placement of all adjacent units, they drive the entire design. In short, never leave corner planning until the end of the process.
Once the corners are set, filling the straight walls is relatively easy. First, place the sink base cabinet centered on the plumbing. Second, place the stove and fridge cabinets. Finally, use standard sized drawer bases to fill the remaining gaps. Ultimately, this methodical approach ensures a tight fit.
Kitchen Cabinet Layout Comparison Table
| Layout | Best Room Size | Storage Score | Workflow Score | Avg Installed Cabinet Cost | Best For |
| L Shape | 10×10 to 15×15 | Good | Great | 4000 to 8000 dollars | Most homes |
| U Shape | 12×12 or larger | Excellent | Excellent | 6000 to 16000 dollars | High use kitchens |
| Galley | 7 to 12 ft wide | Good | Good | 3500 to 7000 dollars | Narrow kitchens |
| Island | 12×12 or larger | Excellent | Variable | Add 2000 to 5000 dollars | Open plan kitchens |
| Single Wall | Under 10×10 | Limited | Limited | 2000 to 5000 dollars | Small apartments |
FAQ
What is the best kitchen cabinet layout?
A U shape offers the most storage and best workflow if you have the space. However, the L shape is the most common and works well in most average homes. Because every house is different, the best layout depends entirely on your specific room dimensions. Ultimately, prioritize function over aesthetics.
How many linear feet of cabinets does a kitchen need?
A standard ten by ten kitchen needs about twenty linear feet of cabinets. On the other hand, a large gourmet kitchen may need forty or more linear feet. Because every design differs significantly, exact requirements vary wildly based on your cooking habits.
How do I plan a kitchen cabinet layout?
First, measure the room precisely in inches. Second, mark fixed points like plumbing and gas lines on your floor plan. Next, solve your challenging corners first before proceeding. Finally, fill the remaining straight runs with standard size units to complete the design.
What is the minimum clearance between kitchen cabinet runs?
You need thirty six inches minimum between parallel runs. However, forty two inches is highly recommended for daily comfort. Furthermore, forty eight inches is absolutely mandatory for two cook households to avoid collisions. Because tight clearances cause frustration, err on the side of more space.