Getting your sink base cabinet dimensions wrong means dealing with jammed plumbing, cramped garbage disposals, or expensive custom cutouts. Here is how to match cabinet width to your sink size, verify plumbing rough-in clearances, and choose moisture-resistant materials.
What Makes a Sink Base Cabinet Different from a Standard Base
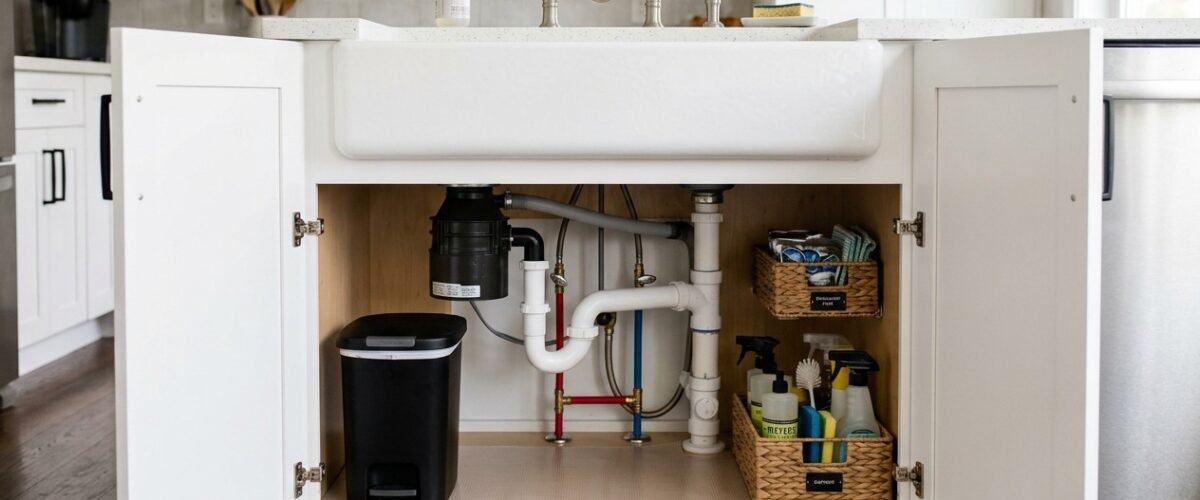
A sink base cabinet looks like a regular base cabinet from the outside, but the inside is completely different. There are no shelves and no center divider — both of those would block plumbing access. Instead, you get an open bay with two doors (or one wide door on narrower models) and a false drawer front at the top that doesn’t actually open. That false front conceals the sink rim and any countertop overhang above the cabinet.
Standard interior construction of a sink base:
- No center stile on face-frame models (or a removable one on some budget lines)
- No shelves (some have a half-shelf on one side for cleaning supplies)
- Reinforced top rail to support the sink weight if it’s a drop-in or undermount
- Notched back panel or back-panel cutout to route supply lines and drain
The false drawer front is worth understanding: it’s attached to the cabinet face with clips or screws, not on drawer slides. When you’re measuring your countertop reveal, that false front height (usually 6 to 7 inches) comes off the top of your interior bay height.
Sink Base Cabinet Widths: Matching the Cabinet to Your Sink
This is where most homeowners get the order backwards. They pick a sink first, then try to find a cabinet. The smarter approach is to understand the width relationship between sink and cabinet, then decide how much counter real estate you want the sink zone to take up.
| Cabinet Width | Recommended Sink Size | Sink Style | RTA Cabinet Cost |
|---|---|---|---|
| 24″ | 18″–20″ single bowl | Drop-in | $160–$350 |
| 27″ | 21″–23″ single bowl | Drop-in or undermount | $190–$400 |
| 30″ | 24″–28″ single or 60/40 double | Drop-in or undermount | $220–$480 |
| 33″ | 29″–31″ single or double | Any | $250–$540 |
| 36″ | 30″–33″ large single or double | Any, including apron-front prep | $280–$620 |
| 42″ | 36″–40″ large double or farmhouse | Apron-front, workstation | $340–$750 |
The rule of thumb: your sink should be at least 3 inches narrower than your cabinet on each side — so a 30-inch cabinet accommodates a maximum 24-inch sink. This leaves 3 inches on each side for the countertop support and sink clip access. Go tighter than 3 inches and you can’t get the mounting clips on without removing the cabinet door.
For apron-front (farmhouse) sinks, the cabinet width rule changes. Apron-front sinks typically need a cabinet 3 to 6 inches wider than the sink itself because the apron face replaces the cabinet door — you’re mounting the sink differently and the cabinet front is cut away. A 30-inch apron sink typically needs a 33 to 36-inch cabinet opening.
Depth Requirements: Plumbing Clearance Behind and Below
Standard sink base cabinet depth is 24 inches — same as all base cabinets. But plumbing inside that 24-inch bay takes up more space than most people expect. Here’s what has to fit in that interior box:
- P-trap: Typically extends 4 to 6 inches from the back wall
- Garbage disposal (if applicable): Hangs 12 to 16 inches below the sink basin
- Supply valves and supply lines: Add 3 to 4 inches of depth against the back wall
- Drain basket and strainer body: Drops 3 to 5 inches below the sink bottom
The practical result: in a standard 24-inch deep sink base, after the P-trap and supply lines are roughed in, you have roughly 14 to 16 inches of usable front-to-back depth for cleaning supplies. A garbage disposal cuts that usable space almost in half on one side.
Minimum clearance from the bottom of the sink basin to the cabinet floor: 12 inches. That’s what most garbage disposal manufacturers (InSinkErator, Waste King, Moen) require for their standard 1/2 HP and 3/4 HP units. The InSinkErator Evolution Excel (the big one) needs 14 inches. If your sink basin is deep (over 9 inches), measure carefully — you might not have clearance for a full-size disposal.
Undermount vs. Drop-In Sink: How the Mounting Style Affects Cabinet Choice
The sink mounting style determines what your cabinet top rail looks like and how much interior space you actually have.
Drop-in (self-rimming) sinks rest on the countertop surface. The cabinet just needs a solid top rail to support the countertop — the sink’s own rim carries the sink weight. This is forgiving: the cutout can be slightly irregular and the rim covers it. Countertop-to-cabinet coordination is minimal.
Undermount sinks attach to the underside of the countertop and are fully supported by the countertop material (stone, solid surface). The cabinet’s top rail must be intact and the countertop must be strong enough to carry the sink weight — a 33-inch undermount cast iron sink can weigh 70 to 90 pounds. Undermounts require a precisely cut countertop template and reveal about 2 to 3 inches more interior cabinet depth since there’s no sink rim eating into the opening.
Apron-front/farmhouse sinks require a modified sink base where the front cabinet rail is cut away. Most manufacturers sell “apron-front ready” sink bases that have a lower front rail height and a reinforced floor. Standard cabinets can be modified, but it requires cutting the face frame — that’s a job for someone with a router, not a circular saw.
Plumbing Rough-In Positions for Common Sink Configurations
Getting the rough-in wrong is a $300–$600 mistake once drywall is up. Here are the standard positions for residential kitchen sink plumbing:
- Drain centerline: Centered horizontally on the sink base cabinet, 6 to 8 inches off the finished floor (stub-out height — P-trap connects here)
- Hot supply line: Left side, 18 to 20 inches off finished floor, 3 to 5 inches left of drain centerline
- Cold supply line: Right side, 18 to 20 inches off finished floor, 3 to 5 inches right of drain centerline
- Dishwasher drain: If dishwasher is adjacent, a knock-out port should be accessible on the right side panel (for most dishwasher configurations)
For a 36-inch sink base with a double-bowl sink, the drain centerline shifts to match the actual drain location — which on a 60/40 bowl split is not the center of the cabinet. Double-check the sink spec sheet before roughing in.
Cabinet Material and Finish: What Holds Up Under a Sink
Under-sink areas are the most moisture-prone spot in any kitchen. Steam, condensation from cold supply lines, and occasional drips all work against cabinet materials that aren’t designed for it.
Here’s how common sink base cabinet materials hold up:
| Material | Moisture Resistance | Cost Range (30″ sink base) | Lifespan Under Sink |
|---|---|---|---|
| Particleboard (standard) | Poor — swells and delaminates | $100–$300 | 5–10 years with proper sealing |
| Plywood (3/4″) | Good — resists swelling | $200–$500 | 15–25 years |
| MDF | Fair — better than particleboard if sealed | $150–$380 | 8–15 years |
| Solid wood | Good if finished, poor if raw | $300–$700+ | 20+ years with proper finish |
| PVC/Thermofoil | Excellent — waterproof | $250–$550 | 20+ years |
If you’re buying a stock or RTA cabinet with a particleboard box, seal the interior before installation. Two coats of oil-based polyurethane on the floor and lower walls of the sink base adds years to its life. Some installers use a simple rubber shelf liner, but that traps moisture underneath — not great long-term.
The Three Sink Base Mistakes That Require a Full Cabinet Swap
These aren’t cosmetic fixes — they mean pulling the cabinet out and starting over:
- Ordering the wrong width for an apron-front sink: You cannot expand a standard sink base for an apron-front sink by cutting the face frame after installation without it looking terrible. Get the apron-front-ready base from the start or plan for a custom cabinet.
- Forgetting garbage disposal clearance: If you install a sink base and then realize the disposal doesn’t have 12 inches of clearance below the basin, your options are a new shallower sink, a batch-feed disposal (shorter), or a cabinet replacement. None of those are cheap.
- Ordering a frameless cabinet for a drop-in sink where there’s no top rail: Full-overlay frameless cabinets with thin top rails (some as thin as 3/4 inch) can’t support a heavy drop-in cast iron sink. The undermount is actually better suited for frameless construction — the countertop carries the load.
Sink base cabinet selection locks in your sink, countertop, and plumbing rough-in in one decision. Get all three measurements confirmed before you order. If you’re planning a corner run that needs to transition into a sink base, read our corner kitchen base cabinet guide — it covers how blind corner and lazy Susan bases interact with adjacent sink runs and the clearances that make or break that configuration.
Related Guides
- Kitchen Base Cabinet Sizes: The Complete Measurement Chart Every Homeowner Needs
- DIY Base Cabinet Installation: 7 Rules for Level & Solid Setup
- How to Level Kitchen Base Cabinets on an Uneven Floor (The Laser Method)
Frequently Asked Questions
What size sink base cabinet do I need for a 30-inch sink?
A standard 30-inch drop-in or undermount sink requires a 33-inch or 36-inch sink base cabinet. The cabinet must be at least 3 inches wider than the sink basin to allow mounting clip installation.
How much clearance is needed below a sink for a garbage disposal?
Most standard garbage disposals require at least 12 inches of vertical clearance from the bottom of the sink basin to the cabinet floor. Deep sinks (over 9 inches) require careful measurement before roughing in plumbing.
Can you install shelves inside a sink base cabinet?
Standard sink bases do not include full shelves due to drain pipes, P-traps, and supply lines. However, u-shaped pull-outs or side-mounted caddies can be added around plumbing fixtures for storage.